
Written: July 28, 2026 · Updated: August 3, 2026
Creative DIY Slime Recipes for Kids’ Sensory Play and Learning
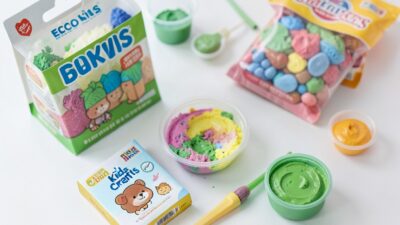
Every child delights in tactile experiences and discovering new textures. What could be more engaging than creating homemade slime? Beyond the entertainment value, making slime provides a wonderful learning opportunity, nurturing fine motor skills, creative expression, and problem-solving abilities. This guide explores the world of homemade slime with eight unique recipes designed to capture children’s imaginations and provide enriching sensory play.
The Benefits of DIY Slime: More Than Just Fun & Games
DIY slime transcends mere crafting; it’s a chance for learning disguised in an enjoyable activity! The hands-on nature allows kids to indirectly explore basic scientific principles. As glue, an activator (like contact lens solution), and other ingredients merge, they participate in changes that produce the satisfyingly stretchy substance we know as slime. slime offers significant developmental advantages:
- Sensory Exploration: The tactile qualities of slime—its squishiness, stretchiness, and malleability—provide rich sensory input, enhancing children’s understanding of textures. This is particularly valuable for children with sensory processing differences.
- Fine Motor Skill Development: Playing with slime strengthens the small muscles in hands and fingers, critical for tasks like writing and buttoning clothes. Kneading, stretching, and manipulating the slime support dexterity and coordination.
- Creativity & Imagination: Slime is a blank canvas! Kids can customize it with colors, glitter, beads, or miniature toys, encouraging self-expression and imaginative storytelling.
- Problem-Solving Skills: Not everything goes according to plan when creating slime; it might be too sticky or too stiff. Addressing these challenges encourages experimentation and critical thinking about how ingredients influence the final outcome.
Important Safety Considerations Before You Start
While generally safe, DIY slime necessitates certain precautions:
- Adult Supervision is Essential: Constant adult supervision during both creation and play is vital. Young children may be inclined to taste it; although ingredients are typically non-toxic, ingestion should always be prevented.
- Non-Toxic Ingredients: Use school glue (PVA glue) as the base. Ensure all added colorings or glitter are non-toxic and suitable for children’s use.
- Activator Alternatives: Borax is a common activator but can cause skin irritation, particularly in sensitive individuals or young children. Contact lens solution (containing boric acid and sodium borate) offers a safer alternative. Always thoroughly research and understand the components of your chosen activator.
- Allergy Awareness: Before beginning, be aware of any allergies within the group. Carefully review ingredient labels for potential allergens like fragrances or dyes.
- Proper Storage: Store homemade slime in an airtight container when not in use to prevent drying and preserve its texture.
Recipe 1: Fluffy Slime – A Cloud-Like Creation
Fluffy slime’s remarkably soft, cloud-like texture makes it a favorite among younger children. It’s exceptionally simple to make with readily available ingredients:
You’ll Need:
- 1 bottle (4 oz) School Glue
- 2-3 cups Shaving Cream (not gel!)
- ½ tsp Baking Soda
- 1 tbsp Water
- Food Coloring (optional)
Instructions:
1. In a bowl, combine the school glue and water. Stir well for complete blending. 2. Add 2 cups of shaving cream to the glue mixture, stirring until uniform consistency is achieved—the mixture will become frothy! 3. Add baking soda and continue mixing thoroughly. 4. If desired, add a few drops of food coloring and mix evenly. 5. Knead with your hands for several minutes until it forms a soft, fluffy texture. Add a tiny bit more glue if the slime feels too sticky.
Recipe 2: Classic Stretchy Slime – Utilizing Borax
This recipe creates a classic stretchy slime utilizing Borax as an activator. Please read the safety warnings at the beginning of this article carefully before attempting, especially if young children are participating.
You’ll Need:
- 1 bottle (4 oz) School Glue
- ½ cup Water
- ½ tsp Baking Soda
- 1/2 tsp Borax Powder
- 1/4 cup Warm Water (for the Borax activator solution)
- Food Coloring (optional)
Instructions:
1. In a bowl, combine school glue and ½ cup water. Stir well until blended. Add food coloring if desired. 2. In a separate container, dissolve ½ tsp of Borax powder in ¼ cup warm water to create the activator solution. Mix completely. 3. Add baking soda into the glue mixture and stir for about 30 seconds 4. Slowly pour the Borax activator solution into the glue mixture while stirring continuously. The slime will form quickly. 5. Knead the slime with your hands until it’s no longer sticky, maintaining its stretchy quality. If too stiff add a bit more water and knead again.
Recipe 3: Crystal Slime – A Shimmering Delight
This recipe produces visually captivating slime resembling glittering crystals.
You’ll Need:
- 1 Bottle (4 oz) Clear School Glue
- 1/2 tsp Baking Soda
- Contact Lens Solution (containing boric acid and sodium borate)
Recipe 4: Glitter Galaxy Slime – Cosmic Fun!
Create a mesmerizing galaxy themed slime with this easy recipe.
You’ll Need:
- 1 bottle (4oz) clear school glue
- 1/2 tsp baking soda
- Contact lens solution containing boric acid and sodium borate
- Purple, blue, pink food coloring (gel is recommended)
- Fine glitter – silver, gold, or any color to resemble stars.
Instructions:
Follow the same instructions as Recipe 3 for clear slime but add a few drops of each colour gel food dye and lots of fine glitter once you’ve added baking soda.
Recipe 5: Butter Slime – Smooth & Satisfying
Butter slime is known for its uniquely soft and smooth texture, resembling butter.
You’ll Need: 1 bottle (4oz) white school glue Contact lens solution (containing boric acid and sodium borate) 2-3 tbsp of Model Magic or similar air dry clay.
Instructions:
Follow instructions from recipe 3 for creating clear slime. Once the slime forms, add the model magic one tablespoon at a time kneading it into the mixture until a butter-like consistency is achieved.
Recipe 6: Rainbow Slime – A Burst of Color
This vibrant recipe transforms plain slime into a rainbow masterpiece!
You’ll Need: 1 Bottle (4 oz) White School Glue Activator (Contact lens solution) Food Coloring – Red, Orange, Yellow, Green, Blue & Violet.
Instructions:
Split the slime into 6 smaller containers. Add a different colour to each container and mix until fully coloured. Combine all colours at once, gently kneading until the swirling effect is achieved.
Recipe 7: Sand Slime – Textured Sensation!
Sand slime provides an extra layer of sensory experience through its granular texture.
You’ll Need: 1 Bottle (4 oz) Clear School Glue Activator (Contact lens solution) Fine Craft Sand – roughly 1/2 cup.
Instructions:
Follow the same process as for clear slime. Once formed add craft sand and gently knead until it’s evenly distributed throughout the mixture.
Recipe 8: Chocolate Scented Slime – A Delicious Sensory Experience!
This recipe introduces a comforting chocolate aroma to your slime creation.
You’ll Need: 1 bottle (4oz) clear school glue 1/2 tsp baking soda Contact lens solution with boric acid and sodium borate Chocolate fragrance oil or extract (a few drops).
Instructions: Follow standard slime instructions, add a couple of drops of chocolate aroma after the slime has formed.
The joy of DIY slime extends beyond mere entertainment—it’s an opportunity for discovery and development. Experimenting with these recipes will undoubtedly spark imagination and create lasting memories for children and families alike. Now that you’ve explored these exciting slime creations, which recipe are you most eager to try first?
Deepening the DIY Slime Guide: Tradeoffs and Tips for Success Here’s Where People Get It Wrong While DIY slime is generally safe, it can sometimes lead to disappointment if not prepared correctly. Using too much activator might result in a hard or sticky slime, while insufficient activation may yield goo instead of the desired slime texture. Striking the right balance is crucial for success. Practical Checklist for Slime Success – Ensure all participants wash their hands before beginning to minimize contamination. – Have a clear workspace with easy access to ingredients and tools. – Use a spoon or measuring cup to mix ingredients precisely, reducing inconsistencies. – Mix gently but thoroughly, allowing each ingredient time to react fully. – Be patient: some recipes require waiting for specific steps to complete before moving on. A Stronger Closing Section Recipe 1: Fluffy Slime – A Cloud-Like Creation (Continued)You’ll Need:
- 5 oz school glue
- 2 tbsp baking soda
- 16 oz shaving cream
- 3-4 tbsp contact lens solution (contains boric acid and sodium borate)
- Food coloring (optional)
- Glitter or confetti (optional)
Follow the steps below to create your fluffy slime:
[…] (existing instructions) Recipe 2, 3, and so on can be added similarly, with unique benefits and ingredients highlighted. By engaging in DIY slime activities, kids not only enjoy a fun sensory experience but also develop essential skills like fine motor control, problem-solving, and creativity. However, always prioritize safety and follow guidelines to ensure a pleasant and educational time for all! Now that you’ve mastered these recipes, what new twist will you add to your slime creations? Share your unique takes with us!